Deploy Your Stylus Smart Contracts
To deploy your Stylus smart contracts to Arbitrum networks, there are a few things you need to adjust.
1. Configure your network
Scaffold-Stylus supports Arbitrum networks by default. You can configure your deployment network using environment variables.
Local Network Setup
For local development, you need to start a local Stylus-compatible network first:
yarn chain
This command starts a local Stylus-compatible network using the Nitro dev node script (./nitro-devnode/run-dev-node.sh). The network runs on your local machine and can be used for testing and development. You can customize the Nitro dev node configuration in the vendored nitro-devnode directory.
Available Networks
This template supports Arbitrum and it's orbit networks only. You can test which networks are available and their RPC URLs:
yarn info:networks
This will show you all supported networks and their corresponding RPC endpoints.
For testnet information, including faucets and RPC endpoints, see the Arbitrum Stylus testnet documentation.
Arbitrum Testnet Faucets
To get testnet ETH for deploying and testing your contracts on Arbitrum Sepolia, you can use the following faucets:
2. Deploy your Stylus smart contract(s)
Deployment Options
Scaffold-Stylus supports deploying to different types of networks:
- Local Network: For development and testing
- Standard Arbitrum Networks: Sepolia, Mainnet, Nova
- Orbit Chains: Custom Layer 2 or Layer 3 solutions (requires special configuration)
Deploy to Local Network
The simplest way to deploy your Stylus smart contract is using:
yarn deploy
This command deploys a test smart contract to the local network. The contract is located in packages/stylus/contracts/your-contract/src and can be modified to suit your needs. The yarn deploy command uses the deploy script located in packages/stylus/scripts to deploy the contract to the network. You can also customize the deploy script.
Create Your Own Contract
Scaffold-Stylus enables you to create and deploy multiple contracts within a single project. Follow the steps below to create and deploy your own contracts.
Step 1: Generate New Contract
Use the following command to create a new contract and customize it as needed:
yarn new-module <contract-name>
The generated contract will be located in packages/stylus/contracts/<contract-name>.
Step 2: Deploy Your Contract
yarn deploy [...options]
This command runs the deploy.ts script located in packages/stylus/scripts. You can customize this script with your deployment logic.
Available Options:
--network <network>: Specify which network to deploy to--estimate-gas: Only perform gas estimation without deploying--max-fee=<maxFee>: Set maximum fee per gas in gwei
Note: Deployment information is automatically saved in packages/stylus/deployments by default.
Check Your Program
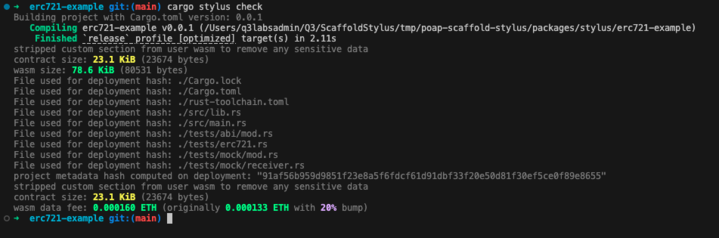
Before deploying to live networks, you can check that your program compiles to valid WASM for Stylus and will succeed a deployment onchain without transacting:
cargo stylus check
This command performs a comprehensive check of your contract, including:
- Contract size validation: Verifies your contract is within deployment limits
- WASM compilation: Ensures your Rust code compiles to valid WebAssembly
- Deployment hash: Computes the project metadata hash for deployment
- WASM data fee estimation: Estimates the cost to deploy your contract
Understanding the Output
When you run cargo stylus check, you'll see output similar to:
Finished `release` profile [optimized] target(s) in 0.13s
stripped custom section from user wasm to remove any sensitive data
contract size: 29.4 KiB (30067 bytes)
wasm size: 105.0 KiB (107494 bytes)
File used for deployment hash: ./Cargo.lock
File used for deployment hash: ./Cargo.toml
...
project metadata hash computed on deployment: "5689e6d67160b086024020d794535313e1411343d0b45565e75ddc055efca5f0"
wasm data fee: 0.000202 ETH (originally 0.000168 ETH with 20% bump)
Contract Size Indicators
Pay attention to the contract size output color:
- 🔴 Red: Contract size exceeds limitations - DO NOT DEPLOY. You need to reduce your contract size.

- 🟡 Yellow/🟢 Green: Contract size is within acceptable limits - OK to deploy.
If you see the contract size in red, you must optimize your contract code to reduce its size before attempting deployment.
When using constructors in your contract, error logs may not be visible during deployment because constructor errors are compiled into the contract. If deployment fails without clear error messages, check your constructor implementation and consider using an initialize() function instead (especially for Orbit chains).
You can edit your deployment scripts in packages/stylus/scripts/deploy.ts to customize the deployment process.
3. Export ABI for your smart contract
If you are using yarn deploy, the script will automatically export the ABI to packages/nextjs/contracts/deployedContracts.ts. You can manually export the ABI for your Stylus program by using:
yarn export-abi
This outputs a Solidity interface that represents your Rust program:
/**
 * This file was automatically generated by Stylus and represents a Rust program.
 * For more information, please see [The Stylus SDK](https://github.com/OffchainLabs/stylus-sdk-rs).
 */

// SPDX-License-Identifier: MIT-OR-APACHE-2.0
pragma solidity ^0.8.23;

interface ICounter {
    function number() external view returns (uint256);
    function setNumber(uint256 new_number) external;
    function increment() external;
}
Exporting ABIs uses a feature that is enabled by default in your Cargo.toml:
[features]
export-abi = ["stylus-sdk/export-abi"]
4. Deploy to Other Networks
To deploy your contracts to other networks (other than the default local Nitro dev node), you'll need to configure your RPC endpoint and wallet credentials.
Prerequisites
Set up Environment Variables
Configure your target network's environment variables. Check
packages/stylus/.env.examplefor the complete template and set the appropriate variables for your target network:# Example for Sepolia
ACCOUNT_ADDRESS_SEPOLIA=your_account_address_here
RPC_URL_SEPOLIA=https://sepolia-rollup.arbitrum.io/rpc
PRIVATE_KEY_SEPOLIA=your_private_key_here
# Example for Mainnet
ACCOUNT_ADDRESS_MAINNET=your_account_address_here
RPC_URL_MAINNET=https://arb1.arbitrum.io/rpc
PRIVATE_KEY_MAINNET=your_private_key_hereNote: If RPC URL is not provided, the system will use the default public RPC URL from that network.
Update Frontend Configuration
Open
packages/nextjs/scaffold.config.tsand update thetargetNetworksarray to include your target chain. This ensures your frontend connects to the correct network and generates the proper ABI indeployedContracts.ts:import * as chains from "./utils/scaffold-stylus/supportedChains";
// ...
targetNetworks: [chains.arbitrumSepolia],
Deploy to Standard Networks
Once configured, deploy to your target network:
yarn deploy --network <network>
You can also estimate gas costs before deploying:
yarn deploy --network <network> --estimate-gas
Deploy to Orbit Chains
Orbit chains require special configuration and have different requirements than standard Arbitrum networks. For detailed instructions on deploying to Orbit chains, see Deploy to Orbit Chains.
- The values in
.env.exampleprovide a template for required environment variables - Always keep your private key secure and never commit it to version control
- Consider using environment variable management tools for production deployments :::